Selasa, 02 Agustus 2016

Guide To Flash / Install Firmware Acer Liquid Z410 Using Flash Tool.


Flash / Install Firmware Acer Liquid Z410. Guidebelajar on this guide will explain to you how to flashing android device on Acer Liquid Z410 with easy and simple stepFlashing in android is the same way like fresh install on the windows PC, So by perform a flash on Android you will give a new performance like a new phone. One reason that you should perform a flash your android is because your android get bootloop or when you failed to install Stock ROM Mod. 


Do you know what is bootloop, Ok.. now I will explain to you what si bootloop. Some people say that bootloop is a problem that occured on an android system which the android system could not sta rt up going to the homescreen menu. And its happened is automatically return to the initial state on the first time when you turn on the Acer Liquid Z410And the device will stop to display on the smartphone logo.

So, If you have any problems on Acer Liqud Z410 bootloop or accidental Acer Liquid Z160 or liquid Z410 is not installed recovery. In this guide Im offering recovery twrp or Cwm. CMW is a recovery that already in recovery mode for customization of the device such that the Acer Liquid Z410 or Z160 with a variety of additional functions in it such as backup / restore, installations and others that are not contained in the standard recovery mode. Generally, in case of a default recovery bootloop Acer Liquid Z410 will g o missing in case of bootloop. whereas the original recoery can not help when there hardbrick.

Now, follow the isntruction list bellow, do it with your own risk.

Prepare Flash Acer Liquid Z410.

  1. Latest SP Flash tool : Download

  2. USB Driver Acer liquid Z410 : Download  Alternative Link

  3. Mtk Droit Tool : Download 

  4. MT65xx USB Driver , Downloa d 

  5. MT6577 USB Vcom Driver, Download

  6. Firmware, download link avalable at the end of this post.

  7. To ensure what is firmware used by your device, you can check by go to Setting ->About -> Software Information ->Build Number.

Flashing Acer Liquid Z410.

  1. At the first time, please Install driver for Acer Liquid Z410 that already downloaded before. T hen remove your back case, battery, sim card and SD Card  if installed
  2. Then, Connect your Acer liquid Z410 to Computer, while holding the power button and volume up. The PC will detect the new hardware, just ignore it. 
  3. Then, release USB data cable from the PC.
  4. Open SP flash tool software and click scatter load. find acer Z410 scatter storage location earlier.
  5. Then , On the file recovery you should give a checklist. click recovery and select the desired recovery. whether use TWRP or CWM.
  6. Then, click download
  7. Next step is plug your Acer Liquid Z410 to your PC (without battery, SIM Card, or SD Card)
  8. Wait process untill finished
  9. Next, Disconnect your Acer Liquid Z410 from your PC.
  10. Enter recovery Mode by : Press Power Button + Volume UP. select Recov ery .
  11. Finally install Stockrom or original firmware (you can find link at the end of this post)
  12. Reboot your phone.
  13. Success.

Download Custom Recovery.

Custom ROM Z410 (recovery--CWM-Mod-Carliv_Z410_Shreps.img)

Acer Liquid Z410 Single SIM

Acer Liquid Z410 Dual SIM


LG Optimus 4X HD P880 user guide manual รข€" LG Optimus 4X HD P880 was released on June 2012 and performed with good camera and compact body plus good screen packed. LG Optimus 4X HD P880 comes with two physical buttons, power/lock button and volume buttom on the left hand side.


LG Optimus 4X HD P880 user guide manual


LG Optimus 4X HD P880 equipped with specifications and key features such as: 132.4 x 68.1 x 8.9 mm in dimension with 133 in weight, 4.7 inch True HD-IPS LCD capacitive touchscreen display 720 x 1280 pixels resolution 16 million colors with multitouch, Corning Gorilla Glass protection and Optimus UI 3, microSD up to 64 GB, 16 GB of internal storage including 12 GB foe user, 1 GB of RAM, 8 megapixel of rear facing camera with autofocus and LED flash, 1.3 megapixel front facing camera, powered by 1.5 GHz quad core NVIDIA Tegra 3, Android 4.0 Ice Cream operating system (upgrade available to Jelly Bean), Li-Ion 2150 mAH battery, stand-by time up to 686 hours and talk time up to 9 hours.    

LG Optimus 4X HD P880 user guide manual is available to download in pdf format that contains of 138 pages. On user guide manual of LG Optimus 4X HD P880, owners will helps with how to use the smartphone in safe and efficient such as introduction, knowledge, multimedia, LG smartworld, settings and surely trouble shooting. LG Optimus 4X HD P880 user guide manual is free to download from LG site here with 2.6 MB in size.

Table of contents for LG Optimus 4X HD P880 user guide manual:

  • Guidelines for safe and efficient use
  • Getting to know your phone
  • Your home screen
  • Google account set up
  • Connecting to networks and devices
  • Calls
  • Contacts
  • Messaging
  • Email
  • Camera
  • Video camera
  • Multimedia
  • LG Smartworld
  • Utilities
  • The web
  • Settings
  • Accessories
  • Troubleshooting

For owner of LG Optimus 4X HD P880, here we give you direct link download of LG Optimus 4X HD P880 user guide manual from official LG website below:

Download LG Optimus 4X HD P880 user guide manual here

Guide To Flash / Bricked - Bootloop LG JOY / KITE H220 - H221G - H222F - H222TTV with Original Stock ROM Using LG Flash Tool (KDZ method).


Flash / Install Firmware LG JOY / KITE H220 - H221G - H222F - H222TTV. LG JOY / KITE H220 - H221G - H222F - H222TTV is the android smartphone which announced in February 2015, and excatly released on 2015, May. Guidebelajar on this guide will explain to you how to flashing android device on LG JOY / KITE H220 - H221G - H222F - H222TTV  with easy and simple stepFlashing in android is the same way like fresh install on the windows PC, So by perform a flash on Android you will give a new performance like a new phone. One reason that you should perform a flash your android is because your android get bootloop or when you failed to install Stock R OM Mod. 

This LG JOY / KITE H220 - H221G - H222F - H222TTV is the smartphone with 4,0 Inchi wide LCD, work on Android OS, v4.4 (KitKat) and supported with Quad-core 1,2 GHz Cortex A7 CPU, QQualcomm MSM8210 Snapdragon 200 Chipset, combined with 512 MB of RAM and 5 MP of  Main camera and VGA on secondary camera. 
Flash / Bricked - Bootloop LG JOY / KITE H220 - H221G - H222F - H222TTV


Some problem on this android is bootloop. Do you know what is bootloop, Ok.. now I will explain to you what si bootloop. Some people say that bootloop is a problem that occured on an android system which the android system could not start up going to the homescreen menu. And its happened is automatically return to the initial state on the first time when you turn on the LG JOY / KITE H220 - H221G - H222F - H222TTVAnd the device will stop to display on the smartphone logo.

So, If you have any problems on LG JOY / KITE H220 - H221G - H222F - H222TTV bootloop or accidental LG JOY / KITE H220 - H221G - H222F - H222TTV is not installed recovery. In this guide Im not offering recovery twrp or Cwm. CMW is a recovery that already in recovery mode for customization of the device such that the LG JOY / KITE H220 - H221G - H222F - H222TTV with a variety of additional functions in it such as backup / restore, installations and others that are not contained in the standard recovery mode. Generally, in case of a default recovery bootloop LG JOY / KITE H220 - H221G - H222F - H 222TTV will go missing in case of bootloop. whereas the original recoery can not help when there hardbrick.

Now, follow the isntruction list bellow, do it with your own risk.

Requirement Tool For Flash LG JOY / KITE H220 - H221G - H222F - H222TTV.

Before you perform flash or install your firmware on LG JOY / KITE H220 - H221G - H222F - H222TTV,

you must download all requirement tool below ;
  1. Download Stock Rom LG JOY / KITE H220 - H221G - H222F - H222TTV Here,&nb sp;
    • This Stock is KDZ file, remember to copy this KDZ file into LG Flash Tool 2014 folder
    • Check the firmware that match with your phone version, 
      • The V10 is the KITKAT version
      • The V20 is for the Lollipop Version
      • And, you can see  a letter, that is little updates, you can download the one with the "last" letter
    • Download Driver LG: Here
    • Latest LG FlashTool : Here

    #1. Guide To Flash LG JOY / KITE H220 - H221G - H222F - H222TTV

    Please follow this guide carefully to flash LG JOY / KITE H220 - H221G - H222F - H22 2TTV.
    1. Make sure you have download all requirement tool above
    2. Then Install the drivers with your phone connected with your Computer, when it finished disconnect your LG JOY / KITE H220 - H221G - H222F - H222TTV phone from your computer.
    3. Now turn your LG JOY / KITE H220 - H221G - H222F - H222TTV phone off, then click continuously on the up volume and connect your phone to your PC, 
    4. Now, enter your LG JOY / KITE H220 - H221G - H222F - H222TTV into download mode.  ( visit this guide or see at the end of this post)
    5. Run LGFlashTool2014.exe.
    6. If you cannot run LGFlashTool2014.exe, You must install Visual C++ Runtime Library, get here
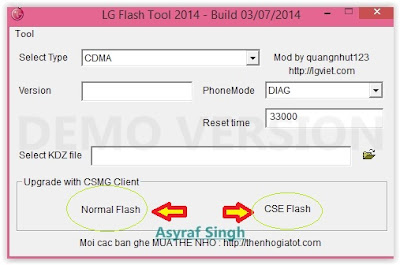
    7. There are two options to flash your LG JOY / KITE H220 - H221G - H222F - H222TTV.

      • Normal Flash : You can select this option if you want Fl ash ROM without losing any data. Only use this when you need to fix system error.
      • CSE Flash : You can choose this option when you need a fresh format. All data will be deleted. Its suitable for upgrading or downgrading ROM or simply use this when you need to back to Stock. 
        LG flash tool normal flash / CSE flash
        LG flash tool normal flas h / CSE flash
    8. Select Type: CDMA
    9. PhoneMode: DIAG
    10. Select KDZ file : browse your KDZ file in your drive
    11. Then you can Click on Normal Flash or CSE Flash (see step 7 to decide this option)
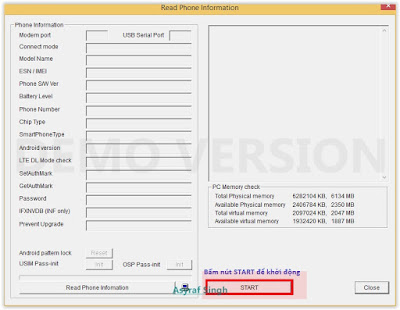
    12. Then click Start.
      LG flash tool - start
      LG flash tool - start
    13. Then click on Clear Phone Software update registry.
      Lg flash tool - Clear Phone Software update registry.
      Lg flash tool - Clear Phone Software update registry.
    14. No need to choose desired language, it automatically change to English as a default setting.
    15. Finally you can c lick OK.
    16. You must wait a minute for the LG Mobile Support tool to recognize the LG JOY / KITE H220 - H221G - H222F - H222TTV device.
    17. When you wait this process, may take 5 minute the tool to recognize it.
    18. The software will start the extraction on your device.
    19. When the process reach 100% your LG JOY / KITE H220 - H221G - H222F - H222TTV will reboot.
    20. Then, you must Unplug your LG JOY / KITE H220 - H221G - H222F - H222TTV from your computer by remove USB Cable from it.,
    21. Finish,

    #2. Guide To Flash LG JOY / KITE H220 - H221G - H222F - H222TTV

    If #1 method is failed to flash your LG Android device, you can use this second method, flashing LG device using R&D Test Tool

    Enter LG JOY / KITE H220 - H221G - H222F - H222TTV To Download Mode.

    To enter LG AKA in download mode, you can follow this guide :
    1. Remove batterei from your phone
    2. Plug USB cable to your PC
    3. Press and Hold volume UP Button, while cable plugs USB Cable from PC to your Phone
    4. Then will appear white note on your LG JOY / KITE H220 - H221G - H222F - H222TTV phone, if you see this you can releasa Volume UP button.
    5. Press and hold volume UP Button on your LG JOY / KITE H220 - H221G - H222F - H222TTV phone again, until you see FIRMWARE UPDATE message.
    6. If your phone has been detected in your PC (to make sure, click the monitor icon beside Read Phone Information button, this action will open device manager windows. If your phon e was detected you can see this at the top)
    7. Click START, and you will see dialogue box, just click OK
    8. Wait for the flash process, it will run in approximately 5 minute and your LG JOY / KITE H220 - H221G - H222F - H222TTV will restart itself
    9. Then your LG JOY / KITE H220 - H221G - H222F - H222TTV phone will boot up, if you can see Welcome Screen, its mean Flashing process is successfully.
    10. Unplug USB cable, and finish
    11. Now your LG JOY / KITE H220 - H221G - H222F - H222TTV is installed new firmware.

      Download CWM Recovery And Firmware Acer Liquid Z410.


      Firmware Acer Liquid Z410. If you need firmware for your Acer Liquid Z410, todays I will share this firmware that fit with your Acer Liquid Z410. You can use this Firmware to flash your Acer Liquid Z410. Why you need this firmware ? I think you have something trouble on your Acer Liquid Z410. There are something happend to your phone, and most problem is bootloop.

      What is bootloop ? All android fan say that bootloop is a problem that occured on an android system which the android system could not start up going to the homescreen menu. And its happened is automatically return to the initial state on the first time when you turn on the Acer Liquid Z410 or Acer Liquid Z4And the device will stop to display on the smartphone logo. So, On this state you can do anything on your Acer Liquid Z410 Device.

      On this article Ill share link that can you download about firmware for your Acer Liquid Z410, This firmware is original firmware, most people call the original firmware with Stock ROM. At the android world we know about ROM, To flash or install your android device to factory standart we need original Stock ROM from developer, but if we want to flash or install our android with the other custom, like install a different ROM from the other platform, so.. we need Custom ROM.

      And what is CWM ? CWM is called ClockworkMod, ClockworkMod recovery at Acer Liquid Z410 allows you to perform sever al advanced recovery, installation, restoration, and maintenance operations on your Acer Liquid Z410 Android device that arenรข€™t possible with the stock recovery, and is one of the most common ways used to gain root access, back up device data, install custom ROMs, kernels, themes & mods, and more.

      If you need CWM Recovery And firmware for your Acer Liquid Z410,


      you can download here by clicking download link bellow.

      Download.

      CWM Recovery Z410 (recovery--CWM-Mod-Carliv_Z410_Shreps.img)

      Firmware Acer Liquid Z410 Single SIM

      Firmware Acer Liquid Z410 Dual SIM

      Senin, 01 Agustus 2016

      Archos 80 Cobalt, ICS Dual Core Tablet with 8 Inch Screen - Archos re-introduce the newest Android product, this time Archos 80 tablet launches Cobalt.

      As the name implies Archos 80 Cobalt comes with an 8-inch touch screen, which has a resolution of 1024 x 768 pixels. Archos 80 Cobalt is powered by a dual core 1.6GHz processor and 1GB of RAM.

      Archos 80 Cobalt comes with 8GB of internal memory, microSD slot, 2 megapixel camera, VGA front camera, Wi-Fi, 4000mAh battery capacity, and uses the Android 4.0 OS Ice Cream Sandwich.

      Archos has not announced the price tag of this latest tablet device, but is expected to Archos 80 Cobalt will be priced at around 149Euro
      Archos 80 Cobalt
      Android Kitkat has been released and many devices have been getting update everyday. The new android Kitkat has many new features and it is also very exiting to use the latest version of Android. But what if some changes are not liked by the user, that is the current situation of some of the android users.
      As the update arrived people updated their devices to the latest android version and they were forced to use Googles own Hangout app the default SMS app.

      Sending message is the most basic feature of any mobile phone any most basic mobile user should be able to use it but in the hangout application even the most technical users sometimes get confused.

      So if you to to have a sepa rate application for sending messages or mms then you can Download KitKat SMS- Android 4.4 SMS

      CLICK HERE TO DOWNLOAD


      Features:
      รข€¢ Kitkat SMS is FREE
      รข€¢ Support SMS MMS on Android 4.4
      รข€¢ Support Android Latest Kitkat - Android 4.4


      Note:To use Kitkat SMS separately from google hangout application please set this Kitkat SMS as your default SMS app.

      Minggu, 31 Juli 2016


      Samsung Galaxy Win I8550 user manual รข€" Samsung Galaxy Win I8550 or Samsung Galaxy Win I8552 or also know as Samsung Galaxy Grand Quattro was released on May 2013 and the Android smartphone support with dual SIM. Smasung Galaxy Win I8550 come with great features to support the Android performance such as: 1.2 Ghz quad core processor, enhanced photo taking for 5 megapixel camera and easy mode.


      Samsung Galaxy Win I8550 user manual


      Samsung Galaxy Win I8550 equipped with specifications and key features such as: 133.3 x 70.7 x 9.7 mm in dimension with 144 g in weight, 4.7 inch TFT capacitive touchscreen display 16 million colors 480 x 800 pixels with multitouch support, microSD up to 32 GB, 8 GB of internal storage, 1 GB of RAM, 5 megapixel rear facing camera with autofocus and LED flash, V GA of front facing camera, Android 4.1.2 Jelly Bean operating system, powered by 1.2 GHz quad core processor Qualcomm MSM8625Q Snapdragon 200 Adreno 203, Li_ion 2000 mAH battery, stand-by time up to 210 hours and talk time up to 11 hours.

      Samsung Galaxy Win I8550 user manual is available to download for new owners in pdf and contains of 111 pages to help you with information and setting up for quickly start the device. Samsung Galaxy Win I8550 user manual guide is your first source and its very important to read the manual user before you use the device. The user manual of Samsung Galaxy Win I8550 is free to download from Samsung site here.

      Table of contents for Samsung Galaxy Win I8550 user manual:

      • Getting started
      • Basics
      • Communication
      • Web & network
      • Media
      • Applications and media stores
      • Utilities
      • Travel & local
      • Setting
      • Troubleshooting


      For new owners of Samsung Galaxy Win I8550, here we give you direct link download of Samsung Galaxy Win I8550 user manual from official Samsung website below:


      Download Samsung Galaxy Win I8550 user manual here
      Samsung I9230 Galaxy Golden user guide manual - Samsung I9230 Galaxy Golden was released on November 2013 with Dual screen display mode and run Android Android 4.2 Jelly Bean. Samsung I9230 Galaxy Golden offers faster multitasking and browsing on internet also good performance by 1.7 GHz quad core processor. Samsung I9230 Galaxy Golden brings stunning images and rich capture with its 8 megapixel main camera.


      Samsung I9230 Galaxy Golden user guide manual

      Samsung I9230 Galaxy Golden equipped with specifications and key features: 118 x 59.5 x 15.8 mm (4.65 x 2.34 x 0.62 inches) in dimension with 179 g (6.31 oz) in weight, 3.7 inches Super AMOLED capacitive touchscreen display 16 million colors 480 x 800 pixels screen display with multitouch, 3.5 inches external Super AMOLED capacitive touchscreen display 480 x 800 pixels, microSD up to 64 GB, 16 GB internal storage, 1.5 GB of RAM, 8 megapixel rear facing camera with autofocus and LED flash, 1.9 megapixel front facing camera, run Android 4.2 Jelly Bean operating system, powered by 1.7 GHz quad core Qualcomm MSM8930 Snapdragon 400 processor Adreno 305 and Li-Ion 1820 mAH battery.

      Samsung I9230 Galaxy Golden user guide manual available to download in pdf file format with 7.19 MB size and contains of 127 pages. The manual pdf of Samsung I9230 user manual guide will help owner, user and buyer to get more important information regarding to the smartphone key features, specs and some default set up for safety and proper.

      Table of contents for Samsung I9230 user guide manual:
      • Getting started
      • Basics
      • Communications
      • Web & network
      • Media
      • Applications & media stores
      • Utilities
      • Travel & local
      • Settings
      • Troubleshooting

      Download Samsung I9230 Galaxy Golden user guide manual here

      Compare Sony Xperia Tipo Dual vs Acer Z110 - Acer Z110 and Sony Xperia Tipo both present dual operating system Android 4.0 ICS. And for performance, Acer Z110 is powered by MTK 6516 chipset with a 1GHz processor and 512MB of RAM, while the Sony Xperia Tipo dual powered with a Qualcomm chip Cortex A5 MSM7225AA with 800MHz processor and 512MB RAM.

      Acer Z110 has a size larger touch screen that measures 3.5 inches with a resolution of 320 x 480 pixels (165ppi). While Sony Xperia Tipo has a dual touch screen measuring 3.2 inches with a resolution of 320 x 480 pixels (180ppi).

      Acer Z110 has an internal memory capacity of 4GB, and the Sony Xperia Tipo dual has an internal memory capacity of 3GB. Both come equipped with a microSD slot up to 32GB.
      Acer Z110 and Sony Xperia Tipo dual both equipped with a 3 megapixel camera. And unfortunately they are not equipped with a front camera.

      For connectivity features both equipped with 3G support HSDPA / HSUPA, WiFi, Bluetooth, GPS, and microUSB port.

      Acer Z110 has a cheaper price tag compared to the Sony Xperia Tipo dual. And Acer Z110 offers several advantages such as a larger touch screen and a 1GHz processor.

      Acer Z110
      Acer Z110 is a smartphone Android 4.0 ICS that comes with touch screen measuring 3.5-inch 320 x 480 pixels. Acer Z110 is powered by a 1GHz processor.
      Acer Z110 comes with 4GB of internal memory plus a microSD slot, 512MB RAM, 3 megapixel camera, WiFi, GPS, Bluetooth, and 3G support HSDPA / HSUPA.

      Sony Xperia Tipo dual
      Sony Xperia Tipo Dual is a smartphone based on Android 4.0 Ice Cream Sandwich which comes with dual SIM GSM + GSM. Sony Xperia Tipo Dual is powered by 800 MHz processor and has a touch screen measuring 3.2 inches with a resolution of 320 x 480 pixels.

      Sony Xperia Tipo Dual comes with other features such as 512MB of RAM, 2.9GB of internal memory plus a microSD slot up to 32GB, 3.2 megapixel camera, Wi-Fi, Bluetooth, aGPS, and a battery capacity of 1500mAh.

      Cara Flash Samsung Galaxy Fame S6810. work !!!.


      Flash Samsung Galaxy Fame S6810. Proses flash di dalam Smartphone android biasa kita kenal dengan proses Install ulang, seperti halnya di dalam sebuah komputer atau PC, Android juga mempunyai hardware yang tertanam di dalamnya, Untuk itu Hardware yang terdapat di dalam Android harus bisa di komunikasikan dengan pemakai atau User melalui sebuah Software, nah software inilah yang mengatur kinerja sebuah smartphone, karena software juga rentan akan rusak sebagai akibat terdelete atau corrupt yang mengakibatkan kinerja Smartphone Android anda melemah. Untuk itu langkah yang paling mujarab untuk mengatasi Samsung Galaxy Fame S6810 Smartphone Android yang sudah lemah adalah melakukan flash atau install ulang. Sehingga setelah anda melakukan flashing pada android anda, anda akan mendapatkan performa seperti Android baru.

      Dalam hal ini yang dilakukan fl ash atau Install ulang adalah firmwarenya, karena di dalam firmware ini adalah merupakan letak dari software atau sistem operasi yang menjalankan Android anda. Ok,,, pastinya anda sudah memahami tentang istilah flashing khan ? untuk itu dalam tutorial ini saya akan memberikan sedikit tips cara melakukan flash pada Samsung Galaxy Fame S6810

      Ada baiknya jika anda ingin mengenal lebih jauh tentang samsung galaxy fame, berikut ni saya kasih penjelasan singkat tentang produk ini :
      flash samsung galaxy fame
      flash samsung galaxy fame

      Fitur yang dimiliki Samsung Galaxy Fame.

      • Intuitive at every turn. Desain kuat namun sederhana, dengan sistem operasi Android 4.1 Jelly Bean akan mengantisipasi dan mengadaptasi kebiasaan penggunaan pribadi Anda.
      • Memiliki Dual Camera 5MP with LED Flash.
      • Didalamnya juga tertanam Internal Memory 4 GB. 512 MB RAM
      • Dengan layar 3.5" Full Touch Screen. memudahkan anda untuk menavigasi ke semua menu yang ada.
      • Teknologi jaringan berada pada HSDPA, HSUPA (900/2100 MHz)
      • Memiliki Prosesor : Single Core 1 GHz Cortex A9
      • Konektivitas : WiFi 802. 11 b/g/n, WiFi Direct, Bluetooth A2DP,
      • MicroUSB
      • Baterai : Li-Ion 1300 mAh

      Kelebihan pada Samsung Galaxy Fame

      • Adanya feature GPS, dng feature ini pemakai dapat tahu koordinatnya dng pas serta real time
      • Memakai sistem operasi teranyar yakni Android Jelly Bean atau V. 4. 1. 2
      • Kamera berkekuatan 5 Mp, dng resolusi maksimum 2592ร‘… ; 1944 pixels, dilengkapi dng feature autofocus, serta lampu LED flash. Mempunyai feature touch focus, face detection
      • Ada feature WIfi, yg tak hanya dapat utk akses internet dapat utk utk sharing koneksi internet dng perangkat lain

      Kekurangan Pada Samsung Galaxy Fame

      • Baterai Galaxy Fame berkapasitas 1300mah terma suk kategori boros
      • Kapasitas baterai cuma 1300 mAh dibawah rata-rata, akan tetapi dapat lakukan panggilan sepanjang 8 jam 40 menit utk mode 2G, serta 5 jam 10 menit utk mode 3g
      • Kapasitas ram yg cuma 512 Mb
      • Layar sentuh jenis standard yakni type TFT kapasitif, bukan hanya IPS maupun Amoled
      • Layar yg demikian mungil yakni 3, 5 inci
      • Kamera utama yg dapat lakukan perekaman type VGA Prosesor yg cuma single core
      • Tak ada feature Video Ouput, hingga tdk dapat menampilkan gambar atau video pd layar tv

      Apa saja yang harus anda siapkan dalam melakukan Flash pada samsung galaxy fame ini ?


      1. Download firmwarenya disini
      2. Download Odin disini
      3. Download Driver USB disini, jika hp anda tidak ke deteksi ,Download USB driver Versi Terbaru.

      Langkah Cara Root Samsung Galaxy Fame

      1. Silahkan anda Install USB Driver ,Setelah selesai install di sarankan reboot Computer anda
      2. Extrak Package Odin Dimana saja. Disarankan dalam satu folder
      3. Turn Off Samsung Galaxy Fame S6810 anda, Hidupkan ke download Mode dengan cara menekan tombol HOME + Volume Down + Power secara bersamaan.

      4. Setelah itu akan muncul Pop-UP peringatan .Tekan tombol volume UP
      5. Hubungkan Samsung Galaxy Fame S6810 anda dengan PC ,Rekomendasi USB ORIGINAL.
      6. tunggu installasi driver selesai (biasanya notifikasi terletak di tray icon ,bawah pojok kanan.
      7. setelah sukses,Buka Odin .pastikan di bagian atas kiri ada ID:COM port HP anda .
      8. jika ada maka berhasil jika tidak, copot USB dan sambungkan lagi ,
      9. jika sudah ke deteck ID:COM portNya ,langsung saja Pilih PDA
      10. Extra Fiemwarenya dan Pilih Firmware Extraka-nya.
      11. tunggu proses Cek SUM md5 selesai
      12. Setelah selesai Klik Start ,dan tunggu proses agak lama ,Di harap Sabar
      13. Ketika selesai  Samsung Galaxy Fame S6810 akan reboot sendiri, dan Jangan di cabut dulu USB.nya.
      14. ketika Di Odin bagian Pojok kiri ada Notifikasi PASS ,maka anda bisa keluar dari odin dengan cara klik exit di bagian bawah kanan. setelah itu cabut USBnya.
      15. Selamat Samsung Galaxy Fame S6810 anda Kembali seperti Awal semula
      Demikian cara flash Samsung Galaxy Fame S6810

      Sabtu, 30 Juli 2016

      Xiaomi the great Chinese Samartphone manufacturer has made its debut in Indian market by releasing its new mobile Mi3 is a superb mobile with great hardware and has many features which are found only in mobiles phones having price more than 30K.

      The Xiaomi Mi 3, which is the companys flagship phone, has a Qualcomm Snapdragon 800 8274AB 2.3GHz processor, Adreno 330 450MHz GPU, 2GB LPDDR3 RAM, and eMMC 4.5 flash memory. The Mi 3 has a 5 inch 1920x1080 display with up to 441 ppi. The phone has a 13 megapixel rear camera with dual-flash and a 2 megapixel front camera.


      Price In India - Rs. 13,999

      The phone is exclusively available on ecommerce site Flipkart.com, and is currently available for only registered users.

      Click Here to Buy from Flipkart


      Specifications

      Qualcomm Snapdragon 800 8274AB
      13 Megapixels Main and 2 MP secondary camera
      Supports 3G(WCDMA) and 2G(GSM) networks, Wi-Fi Displayรฏ¼ŒWi-Fi Directรฏ¼Œ5GHz Wi-Fi, NFC
      3050mAh lithium-ion battery
      2 GB RAM, 16 GB Memory
      5-inch Full HD 1080p LCD IPS touch display, 1920x1080 FULL HD 441ppi
      - Sensors - Gyroscope, Light sensor, Accelerometer, Proximity sensor, Electronic compass, Barometer
      - Android 4.3 optimized with MIUI version 5

      Click here to download best Games for this mobile

      This mobile will be giving a tough competition to Moto G as you will be getting nearly same configurations like Nexus 5 with the price of Moto G. Though people are still worried that it is a Chinese brand and will be of poor quality but remember it has branded hardware. So its up to you to go with it or not. 
      SamTeck recommends this mobile over Moto G.

      Hard Reset OPPO Find Muse r821.


      Hard Reset OPPO find muse r821. Posting kali ini akan saya tuliskan tentang bagaimana cara melakukan Hard Reset pada smartphone OPPO find muse r821, seperti kebanyakan problem yang terjadi pada smartphone, tentang alasan kenapa kita harus melakukan Hard Reset. Misalkan terjadi Bootloop sehingga Smartphone Android anda tidak dapat di hidupkan, atau mungkin lupa terhadap PIN atau Pattern Lock, dan berbagai masalah lainya yang timbul, sehingga kita harus terpaksa melakukan Hard Reset pada Android tersebut.
      Hard Reset OPPO find muse r821
      Hard Reset OPPO find muse r821

      Cara Hard Reset OPPO find muse r821.


      Sebelum melakukan Hard Reset, apakah anda mengetahui apa itu Hard Reset ? Hard Reset adalah pengembalian sistem Android ke pengaturan awal pabrikan yang mana semua yang ada di Smartphone Android akan kembali seperti baru lagi, termasuk aplikasi, pengaturan, tampilan dan sistem itu sendiri. Tetapi untuk versi OS Firmware tidak kembali ke versi dimana Android itu pertama kali dibeli tetapi kembali ke terakhir kali versi OS Firmaware itu diupdate. Fitur hard reset itu se ndiri akan menghapus semua yang ada di Smartphone Android kita kecuali aplikasi bawaan pabrikan dan pengaturan bawaan pabrikan.

      Bagaimana dengan Aplikasi yang anda download, foto, video, atau lagu-lagu ? Kesemuanya itu tidak akan terhapus jika anda menyimpannya di memori eksternal, misal SD Card. Sebaliknya jika kita menyimpannya di memori internal pasti akan terhapus, kecuali gambar bawaan dari Smartphone Android sendiri.

      Jika Anda berminat melakukan hard reset, saran yang utama dalah lakukan backup terlebih dahulu data-data penting anda yang tersimpan di dalam Smartphone Android.

      Baik.. Jika anda sudah memahami istilah Hard Reset pada Smartphone Android, dan sudah paham apa yang menjadi resikonya. Mari sekarang kita lanjutkan langkah dalam melakukan Hard Reset pada Smartphone Android OPPO find muse r821 :


      Langkah-langkah


      1. Matikan Smartphone OPPO find muse r821
        Hard Reset OPPO find muse r821
        Hard Reset OPPO find muse r821


      2. Kemudian Tekan dan tahan bersamaan Tom bol Volume Down+ tombol Power,

      3. Setelah muncul menu Recovery di layar, lepaskan tombol
      4. Kemudian muncul menu seperti gambar dibawah ini.
        Hard Reset OPPO find muse r821
        Hard Reset OPPO find muse r821
      5. Pilih English
      6. Selanjutnya akan muncul menu oppo recovery seperti gambar dibawah ini.
        Hard Reset OPPO find muse r8   21
        Hard Reset OPPO find muse r821

      7. Selanjutnya pilihlah menu "wipe data and cache" -> gunakan tombol volume untuk memilih-milih menu, dan tombol power untuk eksekusi pilihan.
        Hard Reset OPPO find muse r821
        Hard Reset OPPO find muse r821
      8. Sekarang pilihlah "yes" menggunakan tombol volume down dan eksekusilah menggunakan tombol power.
        Hard Reset OPPO find muse r821
        Hard Reset OPPO find muse r821
      9. Proses Wipe akan berjalan, Setelah itu tekan tombol power, untuk konfirmasi menu pilihlah tombol reboot.

        < /li>
      Silahkan anda praktekan Cara Hard Reset OPPO find muse r821 diatas, semoga berhasil.


      PERHATIAN... !!!
      Hard Reset akan menghapus semua data dan akun
      Penulis tidak bertanggung jawab pada resiko yang ditimbulkan sesudahnya.

      How To Unlock Pattern On Xiaomi mi 3 without any tools.


       If you have forgotten you phone password or Pattern or you are unable to turn ON your phone than follow this few steps.


      Step 1: Turn off your phone.

      Step 2: Make sure that battery fully charge.


      Step 3: Press and Hold together Volume up button + Power Button for several seconds to go to recovery mode.

      Step 4: Now, Select  ENGLISH using Volume down key and  power key to confirm.


      Step 5: Now, Select  WIPE AND RESET.


      Step 6: Now, Select WIPE ALL DATA. (warning: your all phone data will be deleted)

      Step 7: Now, wait few seconds to complete the process.

      Step 8: Select Reboot System Now.

      How Hard Reset Acer liquid E2.


      Hard Reset Acer liquid E2. Todays We will explain to you how to perform hard reset on Acer liquid E2 smartphone. Some People say that Hard reset process is call with master reset or factory reset. Many people asking why shoud we perform hard reset to our phone. The logical answer that can I say for this asking is :
      • Because we will sell our Acer liquid E2 Android phones
      • We will give our Acer liquid E2 away to some one else, and we dont want that one know everything about our secret data, so we have to erase all data before back up it.
      • our Acer liquid E2 has been lagging and stuck on android logo, this call with bootloop
      • There are many bug on Acer liquid E2.
      • We want to remove all personal data and setting that wasstored in Acer liquid E2.device.
      • We have forgotten on PIN or Patern Lock at&nb sp;Acer liquid E2.
      • and many other reason.

      1st Methode. Hard Reset ACER LIQUID E2 Using Menu :

      1. Turn on ACER LIQUID E2, by long press on power button
      2. Make sure your battery is fully charged, we recomended taht your battery has 80% power
      3. Always BackUp your importan t data that store in Acer liquid E2.
      4. Go to menu: Setting > Privacy > Factory Data Reset > Reset
      5. Choose Erase everything to confirm that you have ready to do master format or hard reset on Acer liquid E2.
      6. Acer liquid E2. will continoued to hard reset till it back for factory default.


      2nd Methode. Hard Reset ACER LIQUID Z5 DUO (Z150) using Hardware Key.


      1. Turn Off your Acer liquid E2 Handheld first
      2. Make sure your battery is fully charged, we recomended taht your battery has 80% power
      3. Always BackUp your important data that store in Acer liquid E2
      4. Press and hold Power Button + Volume UP together, release it when phone vibrate.

      5. Then, You should release held keys when new Menu appears on the sccreen
      6. Choose Recovery Mode menu. Press Volume UP to scroll to Recovery option and confirm your choice by pressing Volume Down.
        recovery menu acer liquid E2
      7. Hold down the Volume Up and Power button for a short while to see the Recovery Mode menu.


      8. Choose Wipe data/factory reset menu. Press Volume Down to scroll to Recovery o ption and confirm your choice by pressing Power Button.
        Hard Reset Acer liquid E2
        Hard Reset Acer liquid E2
      9. Now, choose "yes" Press Volume Down to scroll to Recovery option and confirm your choice by pressing Power Button.
        Hard Reset Acer liquid E2
        Hard Reset Acer liquid E2
      10. Then press Power Button, to confirm menu and then choose  reboot system now
        Hard Reset Acer liquid E2
        Hard Reset Acer liquid E2
      11. Follow the screen instruction to continued hard reset your Acer liquid E2


      Thats all, you have done to Hard Reset Acer liquid E2,

      ATTENTION... !!!
      Hard Reset/Master reset/Factory Reset may erase all data stored on internal memory and all accoount setting, We  is not responsible for the risks afterward. 
      Do it with your own risk

      Jumat, 29 Juli 2016

      How Hard Reset Acer liquid S2.


      Hard Reset Acer liquid S2. Todays We will explain to you how to perform hard reset on Acer liquid S2 smartphone. Some People say that Hard reset process is call with master reset or factory reset. Many people asking why shoud we perform hard reset to our phone. The logical answer that can I say for this asking is :
      • Because we will sell our Acer liquid S2 Android phones
      • We will give our Acer liquid S2 away to some one else, and we dont want that one know everything about our secret data, so we have to erase all data before back up it.
      • our Acer liquid S2 has been lagging and stuck on android logo, this call with bootloop
      • There are many bug on Acer liquid S2.
      • We want to remove all personal data and setting that wasstored in Acer liquid S2.device.
      • We have forgotten on PIN or Patern Lock at&nb sp;Acer liquid S2.
      • and many other reason.

      1st Methode. Hard Reset ACER LIQUID S2 Using Menu :

      1. Turn on ACER LIQUID S2, by long press on power button
      2. Make sure your battery is fully charged, we recomended taht your battery has 80% power
      3. Always BackUp your importan t data that store in Acer liquid S2.
      4. Go to menu: Setting > Privacy > Factory Data Reset > Reset
      5. Choose Erase everything to confirm that you have ready to do master format or hard reset on Acer liquid S2.
      6. Acer liquid S2. will continoued to hard reset till it back for factory default.

      2nd Methode. Hard Reset ACER LIQUID S2 using Hardware Key.


      1. Turn Off your Acer liquid S2 Handheld first
      2. Make sure your battery is fully charged, we recomended taht your battery has 80% power
      3. Always BackUp your important data that store in Acer liquid S2
      4. Press and hold Power Button + Volume Down together, release it when phone vibrate
      5. Then, You should release held keys when new Menu appears on the sccreen
      6. Choose Recovery Mode menu. Press Volume Down to scroll to Recovery option and confirm your choice by pressing Volume UP.
        recovery menu acer liquid S2
        recovery menu acer liquid S2
      7. Then, you will see Acer Logo appar on screen
        acer logo acer liquid S2
        acer logo acer liquid S2

      8. Choose Wipe data/factory reset menu. Press Volume Down and Volume UP to scroll to Recovery option and confirm your choice by pressing Power Button.
        Hard Reset Acer liquid S2
        Hard Reset Acer liquid S2
      9. Now, choose "yes" Press Volume Down to scroll to Recovery option and confirm your choice by pressing Power Button.
        Hard Reset Acer liquid S2
        Hard Reset Acer liquid S2
      10. Then press Power Button, to confirm menu and then choose  reboot system now.
        reboot acer liquid S2
      11. Follow the screen instruction to continued hard reset your Acer liquid S2


      Thats a ll, you have done to Hard Reset Acer liquid S2,

      ATTENTION... !!!
      Hard Reset/Master reset/Factory Reset may erase all data stored on internal memory and all accoount setting, We  is not responsible for the risks afterward. 
      Do it with your own risk

      How to flash Xiaomi Mi 4i Stock ROM without using any flash tool.


      Step 1:  Download Xiaomi Stock ROM on your phone from below link.


      Step 2: Open Tools Folder from the Launcher and Select Updater like below image.


      Step 3: Now, click on Menu Key on your Device and Select installation file.


      Step 4: Locate the zip file that you have downloaded.

      Step 5: Now, click on the update button to begin the update process.


      Step 6: Now you will  see the update process.


      Step 7: Once update process is completed, select reboot to finish.


      DOWNLOAD:

                                 Xiaomi Mi 1s Android  5.0 stock ROM
      Subscribe to RSS Feed Follow me on Twitter!